
Thinking about tackling a DIY hardwood flooring project? It’s a fantastic way to transform a room with your own hands and can definitely save you some money on labor. But let's be honest—it’s a serious undertaking. Success comes down to meticulous planning and a real gut-check on whether you're up for the challenge.
Is DIY Hardwood Flooring the Right Project for You?
Jumping into a flooring project is a major commitment of time, energy, and, of course, money. It's not just about laying down planks. You’ve got subfloor prep, precise measurements, tricky cuts around doorjambs and vents, and a surprising amount of physical work.
It’s no secret that homeowners around here in Cumming and Johns Creek are renovating more and more. In fact, if you look at the bigger picture, residential replacements now make up about 66.4% of all wood flooring sales. This insight from some recent hardwood flooring market trends shows that most projects are just like yours—upgrading an existing space, not starting from scratch.
First Decisions: Solid vs. Engineered Hardwood
Before you go any further, you have a big decision to make: solid or engineered hardwood? They look similar but behave very differently, and your choice will impact everything from installation to long-term durability.
- Solid Hardwood: This is the classic choice—each plank is milled from a single, solid piece of timber. It's beautiful, timeless, and its biggest advantage is that you can sand and refinish it multiple times over its lifetime.
- Engineered Hardwood: This option features a top layer of real hardwood bonded to multiple layers of plywood or high-density fiberboard. That layered construction makes it incredibly stable, so it won’t expand and contract as much with changes in temperature and humidity.
A lot of people think engineered flooring is "fake wood," but that's a common misconception. The part you see and walk on is 100% genuine hardwood. Its core just provides better structural integrity, making it a really smart choice for the humid climate we often get here in Forsyth County and Milton.
To help you sort it out, let’s break down the key differences. This is the first and most important choice you'll make.
Solid vs. Engineered Hardwood at a Glance
Understand the key differences to make an informed choice for your home's needs and environment.
| Feature | Solid Hardwood | Engineered Hardwood |
|---|---|---|
| Composition | Single piece of solid wood | Real wood veneer over a multi-layer core |
| Installation | Nail-down only; must be installed over a wood subfloor | Can be nailed, stapled, glued, or floated; versatile for different subfloors |
| Durability | Very durable but susceptible to moisture and humidity changes (cupping/gapping) | More stable; less likely to warp or swell in humid conditions |
| Refinishing | Can be sanded and refinished multiple times (4-5+ times) | Can be refinished 1-3 times, depending on the thickness of the top veneer layer |
| Best For | Living rooms, bedrooms, dining rooms—anywhere above ground level | Basements, kitchens, bathrooms, and homes built on concrete slabs |
| Cost | Generally higher initial cost for materials | Often more budget-friendly, depending on the veneer and species |
Making the right choice between solid and engineered really comes down to where you're installing the floor and what your local climate is like. Think carefully about your specific room and its conditions before you fall in love with a particular sample.
Essential Planning and Preparation
I’ve seen it a hundred times: a DIY hardwood flooring project lives or dies in the planning stage. Long before you even think about laying that first board, the groundwork you do will determine whether you end up with a beautiful, professional-looking floor or a series of costly headaches.
Think of this as your blueprint. Getting the details right now saves you from running out of material, fighting with warped boards, or realizing you don't have the right saw. Let's walk through the essential checks that I never skip.
Measure Twice, Order Once
First things first, grab a tape measure. You need to get the exact square footage of your room. For a simple rectangle, just measure the length and width and multiply them. If you have an L-shaped room, break it into two separate rectangles, calculate the area for each, and then add them together.
Now for the crucial part: the "waste factor." This isn't for mistakes you might make; it’s for the small pieces you'll inevitably cut off to fit boards around walls, doorways, and other obstacles. A good rule of thumb is to add an extra 10% to your total square footage. If you’re planning a diagonal layout or have a room with lots of funky angles, bump that up to 15%.
I can't stress this enough: ordering too little flooring is a classic DIY mistake. It’s a complete nightmare to run out mid-job, only to find the new batch you order doesn't quite match in color. Always order that extra 10-15%. Plus, having a few spare planks stashed away for future repairs is a lifesaver.
Choosing Your Wood and Understanding Hardness
Once your measurements are locked in, you get to the fun part—picking the wood. The species you go with will define not just the look of the room but also how well the floor holds up over time. Around here in Cumming and Forsyth County, oak is a perennial favorite for its classic look and durability. If you want something a bit darker and more dramatic, walnut is a fantastic choice.
To get a real sense of a wood’s toughness, you’ll want to look at its Janka hardness rating. This number tells you how well a species resists dents and dings.
- Red Oak: A solid, reliable choice with a Janka rating around 1290. It's the industry standard for a reason.
- Hickory: This is one of the toughest domestic woods you can get, coming in at about 1820. Great for high-traffic areas.
- Brazilian Cherry: An exotic known for being incredibly hard, often rating over 2350.
This is a big decision, and it’s worth taking your time. We put together a guide on https://flacksflooring.com/how-to-choose-hardwood-flooring/ that dives deeper into the pros and cons of different species, finishes, and plank widths.
The Non-Negotiable Acclimation Period
Whatever you do, don't plan on installing your new floors the day they’re delivered. Wood is a living, breathing material that expands and contracts with humidity and temperature. Your new planks need time to acclimate to the environment inside your home, or you’ll be dealing with ugly gaps or buckling down the road.
Simply carry the unopened boxes into the room where you'll be installing them and let them sit for at least 72 hours. This allows the moisture content of the wood to match the room's conditions. Trust me, skipping this step is the single biggest cause of flooring failures I see.
Gathering Your Essential Toolkit
Nothing kills momentum on a project like having to stop and run to the hardware store. Before you begin, get all your tools organized and ready to go.
- Measuring Tools: You'll need a tape measure, a square for accurate angles, and a chalk line to snap straight reference lines on your subfloor.
- Cutting Tools: A miter saw is a must-have for making clean, precise cuts. You’ll also want a jigsaw for those tricky cuts around things like floor vents or pipes.
- Installation Gear: This depends on your installation method. You’ll need a flooring nailer and air compressor for a nail-down, or a trowel and adhesive for a glue-down. For floating floors, a tapping block and pull bar are essential.
- Safety Equipment: Don't even start without safety glasses, gloves, and a good pair of knee pads. Your body will thank you later.
The desire to tackle projects like this is part of a huge trend. The hardwood flooring market is massive, projected to grow from USD 51.38 billion to nearly USD 69.78 billion by 2033. If you're just getting your feet wet, this excellent beginner's guide to hardwood floor installation is a fantastic resource that covers everything from planning to the final nail. It’s worth a read as you put your own plan together.
Getting the Foundation Right: Subfloor Prep for a Flawless Finish
Here’s a hard-learned truth from decades in the business: your gorgeous new hardwood is only as good as the foundation you lay it on. The real secret to a quiet, solid, and long-lasting floor isn't just about the planks you pick. It all comes down to the painstaking work you do on the subfloor before a single board is laid.
Cutting corners here is the #1 reason for almost every flooring headache down the line, from maddening squeaks to ugly gaps between boards.
No matter what, your subfloor has to be three things: clean, flat, and dry. This is non-negotiable, whether you’re dealing with the plywood in a classic Milton colonial or a concrete slab in a newer Johns Creek build. Before you even think about underlayment, let's get what's underneath in perfect shape.
First, rip out all the old flooring and get down to the bare subfloor. Now, get it truly clean. I mean scraping up every bit of old glue, pulling every last staple, and then sweeping and vacuuming until it’s spotless. You want a completely blank canvas for your new floor.
Finding and Fixing Faults in Your Subfloor
With the subfloor exposed, it's time for an inspection. Walk every single inch of the room. Feel for any bounce or give underfoot. Listen for squeaks. That tell-tale squeak is almost always the plywood subfloor rubbing against a nail as it moves up and down on the joist. An easy fix is to drive a few long screws through the subfloor directly into the floor joist below to cinch everything down tightly.
Next, you need to check for flatness. Grab the longest straightedge or level you can find—a 6- or 8-foot one is perfect. Lay it across the floor in multiple directions, like the spokes of a wheel. You're hunting for any high spots or low spots. The industry standard is tight: you can't have any variation greater than 3/16 of an inch over a 10-foot span.
- For High Spots: On a plywood subfloor, a belt sander can work wonders on raised seams. For concrete, you might need to rent a concrete grinder to knock down any significant bumps.
- For Low Spots: This is where self-leveling compound becomes your best friend. It’s a pourable solution that fills in dips and valleys, creating a perfectly flat surface. It's an absolute must for getting concrete slabs ready.
Believe me when I say that getting the subfloor perfectly flat is the single most important part of any DIY hardwood flooring job. This is what stops that hollow, bouncy feeling and ensures that modern click-lock flooring systems engage securely without being stressed to the breaking point. If you've got some major dips and slopes, our detailed guide on how to level uneven floors walks you through the pro techniques for tackling bigger challenges.
Making Sure It's Dry
Moisture is the mortal enemy of any wood floor. It will cause your beautiful new planks to swell, cup, and buckle. So, before you go any further, you have to test the moisture content of your subfloor. You can grab a simple moisture meter from any big-box hardware store; it's a small investment that can save you from a huge disaster.
If you have a concrete subfloor, there's a classic test you can do. Just tape a small square of plastic sheeting to the floor and let it sit for a full 24 hours. When you pull it up, if you see any condensation on the underside of the plastic, you've got a moisture problem. You’ll need to solve that with a concrete sealant or a heavy-duty vapor barrier before you can even think about putting wood down.
Choosing Your Underlayment
Okay, your subfloor is finally clean, flat, and dry. The last prep step is picking the right underlayment. This is the thin layer that goes between the subfloor and the hardwood, and it does a few important jobs.
- Felt or Rosin Paper: This is the old-school standard for solid hardwood that you're nailing down over plywood. It acts as a vapor retarder and provides a little slip sheet between the wood layers to help prevent future squeaks.
- Foam Underlayment: Typically used with floating engineered floors. It gives a bit of cushion, dampens sound, and many versions come with a moisture barrier already attached, making them great for concrete slabs.
- Cork Underlayment: This is your best bet for sound reduction. If you're installing on a second story or in a condo, cork is fantastic at stopping sound from traveling to the room below.
Taking the time to get this prep work right is what separates an amateur job from a professional one. It ensures your hard work results in a stunning, stable floor that will look great for decades to come.
Alright, this is where the real work begins. You’ve planned, you’ve prepped, and now it’s time to transform that stack of wood into a stunning new floor.
The installation method you pick really depends on three things: the type of hardwood you chose, the subfloor you're working with, and honestly, your own DIY confidence level. We'll walk through the big three: nailing, gluing, and floating. Each has its own feel and set of tricks, so let's get into the nitty-gritty of what actually happens on the ground.
The Classic Nail-Down Method
This is the old-school, tried-and-true technique, and it’s my personal favorite for solid hardwood going over a wooden subfloor. When you nail a floor down, it feels incredibly solid—like it’s always been part of the house. The magic happens with a special tool called a flooring nailer. It’s designed to drive a cleat or staple at the perfect angle right through the tongue of the board, hiding the fastener and locking the plank down tight.
If you take away one thing, let it be this: your first row has to be perfect. Absolutely, positively straight. It sets the stage for the entire room.
- Start by snapping a chalk line. A good rule of thumb is to measure the width of your plank, add your expansion gap (usually about 1/2 inch), and make your line that far from the wall.
- That first row gets face-nailed into place. To avoid splitting the wood, take the time to pre-drill your holes. It's a bit tedious, but worth it.
- After that starter row is locked in, you can break out the flooring nailer and start moving, fastening each new row through the tongue.
I’ve seen it a hundred times: someone gets a little too excited with the flooring nailer and starts moving too fast. That heavy mallet feels powerful, but one misplaced hit can chip or splinter the edge of a brand-new plank. Find a rhythm. Seat the nailer flat on the board, give the mallet a firm, confident whack, and then move to the next spot. Slow and steady wins this race.
The Secure Glue-Down Method
If you’re working with a concrete slab, which is pretty common in many homes around Johns Creek and Cumming, gluing down is your go-to method, especially for engineered hardwood. It’s exactly what it sounds like: you trowel on a special wood flooring adhesive and carefully set your planks into it.
The secret to a successful glue-down job is all in the adhesive and your trowel. Seriously. The Georgia humidity is no joke, so you need an adhesive rated for our climate.
Your trowel choice is just as critical. The little notches on the trowel control how much glue you spread. Too little, and your boards won't bond properly; too much, and you'll spend the rest of the day cleaning up a sticky mess that squeezes up between your planks. The adhesive bucket will tell you exactly which trowel size to use—don't guess on this part.
Work in small, manageable areas. Only spread enough glue to lay planks for the next 15-20 minutes. If you go too big, the glue will start to get a "skin" on it and won't stick properly.
The DIY-Friendly Floating Floor Method
Floating floors are almost always engineered hardwood with a click-lock or tongue-and-groove system, and they are a DIYer's best friend for a reason. The planks aren't actually attached to the subfloor. They lock together to form a single, solid surface that "floats" on top of an underlayment pad. It's fast, relatively clean, and incredibly forgiving.
The real art of a floating installation isn't in fastening, it's in two other things: getting a perfectly tight seam and making clean cuts around obstacles.
- Get the Lock Right: You'll need a tapping block and a pull bar. Never, ever hit the plank directly with your hammer. A few gentle taps on the block are all you need to click the boards together. Trying to force it will just damage the locking system.
- Handle Obstacles Like a Pro: Door casings are the classic challenge. The cleanest way to handle them is to use an undercut or jamb saw to trim a sliver off the bottom of the casing. Then, your flooring slides right underneath for a seamless, professional look.
Modern flooring systems have become so much more accessible, thanks in large part to online retailers. While it's still a smaller slice of the pie, e-commerce in flooring is growing fast—at an estimated CAGR of 15.35%. Tools like augmented reality visualizers let you see how a floor will look in your own room, which has really changed the game. You can learn more about these hardwood flooring market transformations and how they’re empowering homeowners.
To help you sort through the options, let’s break down which method might be best for your project.
Which Installation Method Is Right for You?
Compare the main installation methods to see which best fits your skill level, subfloor, and flooring type.
| Method | Best For | DIY Difficulty | Key Consideration |
|---|---|---|---|
| Nail-Down | Solid hardwood over a plywood subfloor | Intermediate | Creates a very solid, permanent floor. Requires renting or buying a flooring nailer. |
| Glue-Down | Engineered hardwood over concrete or plywood | Advanced | Provides excellent stability but can be messy. Requires careful adhesive application. |
| Floating | Engineered hardwood with a click-lock system | Beginner | Fast and forgiving. Perfect for basements, condos, and over existing floors. |
Ultimately, no matter which path you take, the core principles are the same: work patiently, measure twice, and focus on getting every board straight and secure.
Applying the Finishing Touches for a Polished Look
You’ve laid the last plank. The heavy lifting of your DIY hardwood flooring project is officially behind you, but don’t crack open the celebratory drink just yet. Now comes the detail work—the final steps that take a floor from looking "pretty good for a DIY" to genuinely professional. This is all about concealing the raw edges and protecting your hard work for the long haul.
Putting the final touches on your new floor really means creating clean lines and seamless transitions. You’ll need to reinstall your old baseboards or, better yet, put in new ones to perfectly hide that expansion gap you left along the walls. And in doorways, transition strips are essential for gracefully connecting your new hardwood to the tile in the bathroom or the carpet in the adjoining bedroom.
Perfecting the Details with Trim and Fillers
First up is installing the baseboards and any shoe molding. This is where a good miter saw is your best friend. Take your time, measure carefully, and aim for clean 45-degree angles on all your corners. When you’re ready to attach the trim, use a brad nailer and make sure you’re firing into the wall studs—never into your new floating floor.
Once the trim is on, you'll see all those tiny nail holes. The secret to making them vanish is a good color-matched wood putty.
- Find the Right Filler: Grab a putty that’s a close match to your floor’s color. Don't be afraid to mix two shades together on a scrap piece of cardboard to get it just right.
- A Little Dab Will Do: Use your fingertip to press a small amount of putty into each hole. You don't need to overdo it.
- Wipe Clean Immediately: Use a clean, soft cloth to wipe away any excess before it dries. If you wait too long, it can leave a hazy film on your finish that’s a pain to remove.
This little bit of effort makes a huge difference, giving your trim work a flawless, high-end look.
Here's a trick I've picked up over the years: before you start with the putty, run a line of painter's tape along the floor right up against the baseboard. It catches any smudges and lets you work quickly without stressing about getting filler on your brand-new floor. Just peel it up when you're done for a perfectly clean edge.
Choosing the right installation method is a key decision for any flooring project. This visual guide simplifies the choice based on your subfloor type.
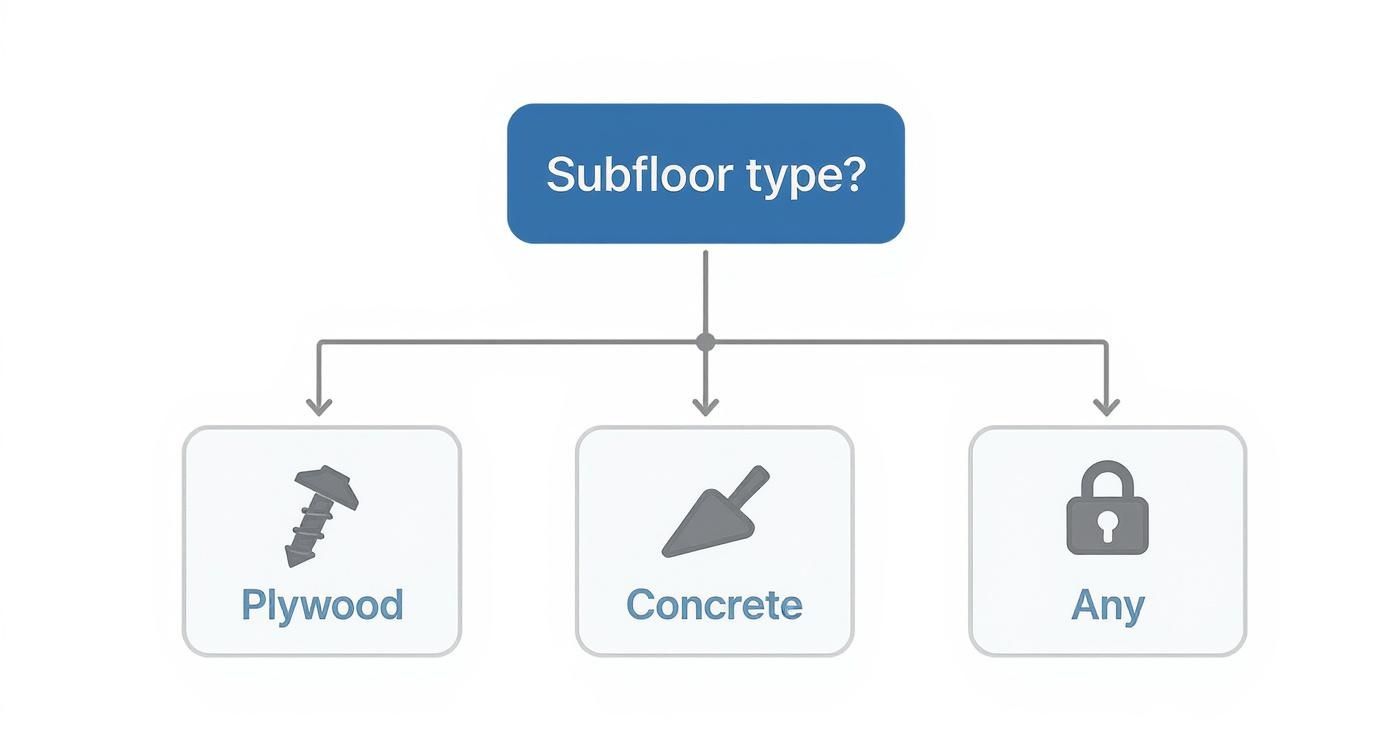
As you can see, the subfloor really dictates the best approach. Plywood gives you the classic nail-down option, concrete points toward a glue-down application, and a floating floor offers great versatility for almost any situation.
Long-Term Care and Maintenance for Lasting Beauty
Your beautiful new floor is an investment, and protecting it starts the moment you’re done. Proper care isn't rocket science, but it does demand consistency and using the right stuff.
First things first: get some high-quality felt pads and put them on the bottom of everything that touches the floor. I’m talking chairs, tables, sofas, credenzas—if it moves, it gets a pad. Scratches from furniture are the number one enemy of a perfect finish, and this is the easiest way to prevent them. For busy homes in places like Cumming and Johns Creek, this is absolutely non-negotiable.
Next, get into a simple cleaning routine. A regular sweep or vacuum (using a soft-bristle head attachment, please!) is your best defense against the grit and dirt that can act like sandpaper over time. When you need to do a deeper clean, stick with a pH-neutral hardwood floor cleaner specifically recommended by the flooring manufacturer.
There are also a few hard-and-fast rules for what not to do:
- Never Use a Steam Mop: That combination of high heat and moisture will wreck your wood and its finish. It’s a guaranteed way to cause warping and damage.
- Avoid Oil Soaps or Wax: These products sound like they’d be good for wood, but they build up over time, leaving a dull, greasy film that’s nearly impossible to remove.
- Don't Use Vinegar and Water: It might be a go-to cleaner for other surfaces, but vinegar is acidic. Over time, it will slowly eat away at your floor's protective finish, leaving it vulnerable.
For those inevitable minor scratches, a touch-up marker or a wax repair stick made for hardwood can work wonders. If you get a really deep gouge, you’ll be glad you saved those few extra planks from the installation for a board replacement. Follow these simple steps, and the floor you worked so hard on will stay a source of pride and beauty for years to come.
When to Hire a Professional Instead
There's nothing quite like the satisfaction of standing on a beautiful hardwood floor you installed yourself. But a smart DIYer knows their limits. While the allure of saving money on labor is strong, some jobs have hidden traps that can turn a weekend project into a costly nightmare. You have to be honest with yourself about your skills, the time you have, and the realities of your space.
Making the call to a pro isn't admitting defeat—it's just smart project management. It protects your investment in both time and materials, ensuring you get a floor that looks great and lasts for decades. There are a few clear signs that should make you think twice before diving in.
Red Flags That Signal It's Time for a Pro
Some challenges go way beyond a standard installation. They demand specialized tools, years of experience, and a level of know-how that you just can't get from watching a few online videos. Pushing through these issues on your own is a recipe for disaster.
- Seriously Uneven Subfloors: A little dip here or there can be handled with self-leveling compound. But if you're dealing with major slopes, humps, or valleys, you need a pro. They have the grinders and planers to create a perfectly flat foundation, which is non-negotiable for a successful installation.
- Tricky Room Layouts: A straightforward square or rectangular room is one thing. But what about rooms with curved walls, multiple angles, or a complex herringbone pattern? The precision cuts required for these jobs are incredibly difficult and unforgiving. One wrong cut can throw the whole pattern off.
- Expensive or Fussy Materials: Did you fall in love with pricey reclaimed lumber, a rare exotic wood, or extra-wide planks? The more you spend on materials, the higher the financial risk of a mistake. Professionals handle these woods every day and know how to minimize waste and account for their unique quirks.
- Major Structural Repairs: If you pull up the old flooring and find soft spots, rot, or damaged joists, stop immediately. This is no longer a flooring project; it's a structural repair job that requires a deep understanding of home construction.
Knowing your limits is the most important skill in DIY. A botched flooring job will cost you far more to tear out and fix than it would have to just hire a pro from the start. A good crew in the Cumming or Milton area can get the job done in a fraction of the time, with guaranteed results and way less disruption to your life.
This idea of knowing when to get help isn't just about flooring. It's a key principle for any homeowner. For instance, it’s a lot like understanding when to call a professional for complex home tasks like wasp nest removal. Just as you wouldn't tackle a dangerous pest problem without the right expertise, you shouldn't risk a massive flooring investment if the job is over your head. The goal is always a safe, successful outcome.
Common Questions About DIY Hardwood Flooring
Even the best-laid plans run into a few questions once you start a big project. I get it. Here are some of the most common things homeowners in Cumming and Forsyth County ask when they're getting ready to install their own hardwood floors.
How Much Extra Flooring Should I Buy?
The rule of thumb I always tell people is to order 10-15% more flooring than what you measured. This isn't about upselling you; it's what the industry calls a "waste factor."
This extra bit covers all the little things that happen on a job:
- The small pieces you'll have to cut to fit against walls.
- The occasional board with a natural knot or grain pattern you just don't love.
- That one "oops" cut we all make.
If you're installing on a diagonal or the room has a bunch of funky angles, definitely lean toward that 15% mark. Trust me, it's far better to have a few extra boards left over than to run out with one row to go.
Can I Install Hardwood Over My Old Floor?
This is a classic "it depends" situation. Sometimes, you can. For instance, putting a floating engineered floor over a single layer of old, flat vinyl or tile is often doable.
But for a traditional nail-down or glue-down solid hardwood, you almost always have to pull up the old flooring. You need direct, solid contact with the subfloor. Never, ever try to install new hardwood over old carpet or any surface that’s damaged, uneven, or spongy.
The most critical step in the whole process is subfloor preparation. Nearly all major flooring failures can be traced back to a subfloor that wasn't perfectly flat, clean, and dry. Investing extra time here prevents major problems later.
When you hear squeaks or see gaps and buckled boards, the problem usually started with a poorly prepped foundation. We have a whole guide on how to fix squeaky hardwood floors that often points right back to what’s happening underneath.
Taking your time on these foundational steps is what ensures your hard work pays off with a beautiful floor that lasts for decades.
Considering new hardwood, waterproof flooring, or carpet for your home in Johns Creek or Milton? The experts at Flacks Flooring are here to help you find the perfect solution for your space and budget. Visit our showroom in Cumming, GA, or schedule a consultation on flacksflooring.com to get started.