
For years, the conventional wisdom was simple: keep wood flooring out of the basement. Period. But that rule was written for solid hardwood, and times have changed. Today, you absolutely can get that genuine wood look in a below-grade space, thanks to a smarter alternative: engineered hardwood.
The Smart Way to Put Hardwood in Your Basement
Let's clear the air—engineered hardwood isn't a "fake" wood floor. It's the real deal, just constructed in a way that makes it far more resilient. This innovative design is precisely what makes it the only reliable choice for putting a beautiful, authentic wood floor in a basement.
Think of an engineered plank as a feat of wood technology. It has a top layer of beautiful, solid hardwood—the part you see and feel—but underneath, its core is made of multiple layers of wood composite. These layers are fused together in a cross-grain pattern, which is the secret to its incredible stability.

Why Structure Matters Below Ground
Basements are a tough environment for flooring. They're naturally prone to higher humidity and temperature swings. A solid piece of wood will soak up that ambient moisture and expand, then shrink as it dries. This constant movement is what leads to big problems.
You've probably seen the results:
- Warping: Planks start to twist and bend.
- Cupping: The edges of the boards rise higher than the center.
- Gapping: The wood shrinks, leaving ugly spaces between planks.
The layered core of engineered hardwood is designed to fight this. As one layer tries to expand or contract, the perpendicular layer next to it pulls in the opposite direction, essentially holding it in place. This internal tug-of-war is what gives the plank its structural integrity, preventing it from distorting in a damp environment.
This means you get the look, feel, and warmth of real wood without the constant worry. If you're weighing all your options, our guide on choosing a basement floor is a great place to dig deeper.
This built-in resilience is why engineered wood now dominates the market. It holds a staggering 72.37% share of the entire hardwood flooring industry worldwide, a number that's only expected to grow.
So, is putting engineered hardwood in a basement a good idea? It's more than that. It’s a reliable, stylish, and intelligent way to add lasting value and timeless appeal to your home’s lower level.
Deconstructing an Engineered Hardwood Plank
To really get why engineered hardwood is the MVP for basements while solid wood sits on the bench, you have to look at how it's built. An engineered plank isn't just a slab of wood; it's a carefully constructed sandwich of materials designed from the ground up for stability. This multi-layered design is its secret weapon against the challenges of a below-grade space.
The top layer—the part you actually see and live on—is the wear layer. This is a slice of real, authentic hardwood. Whether you love the classic look of oak, the rich tones of hickory, or the clean feel of maple, that's what you're getting. It's not a photo or a plastic fake, which is why engineered floors have that genuine wood warmth and character.
But the real magic isn't on the surface. It's in what lies beneath.
The Power of a Laminated Core
The core is the unsung hero that gives engineered hardwood its remarkable resilience to moisture and temperature swings. It’s usually made from multiple layers of plywood or a super-dense fiberboard, all fused together with intense heat and pressure.
Think of it like this: a single piece of paper is flimsy, but stack 100 pieces together and you've got something strong. The core of an engineered plank takes this a step further. The wood grain in each layer runs perpendicular to the layer above and below it. This cross-grain construction creates an internal tug-of-war.
If one layer tries to swell up from humidity, the layers next to it are pulling in the opposite direction, holding it in place. This clever design stops the plank from warping, cupping, or gapping—all common problems for solid wood when it meets the dampness of a basement.
This layered approach essentially uses wood's natural tendencies against itself to forge a plank that stays flat and stable, even when the environment isn't. It’s a brilliant bit of engineering.
This infographic gives a great visual of how engineered and solid hardwood stack up against humidity.
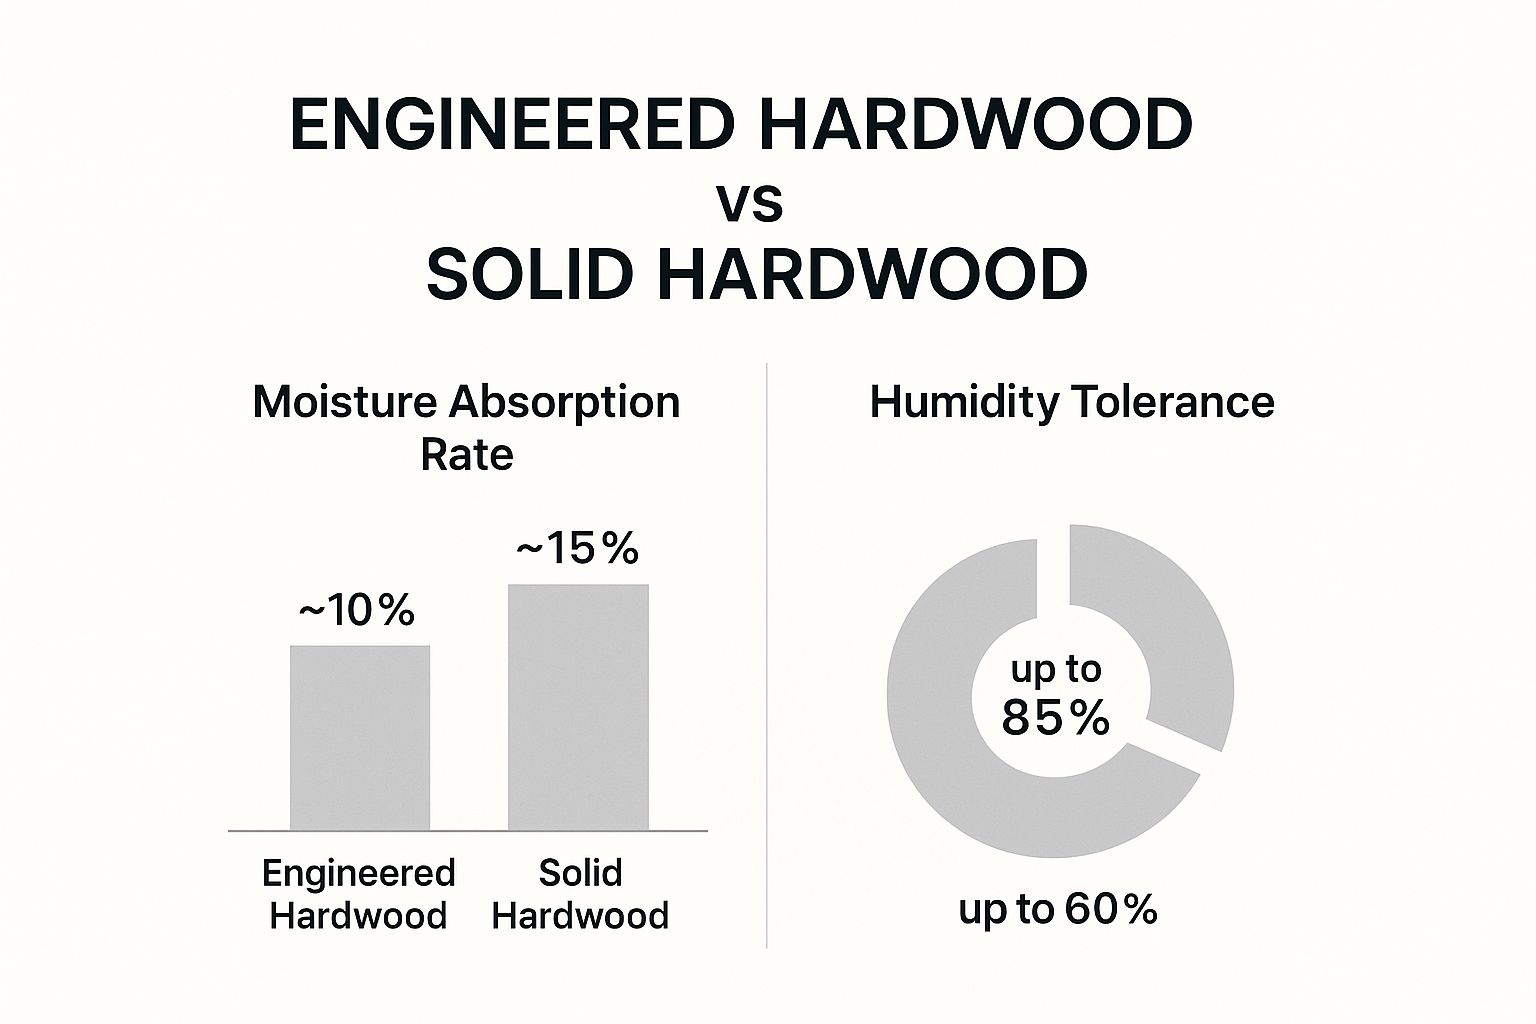
As you can tell, engineered hardwood is built to handle the kind of humidity that's a deal-breaker for solid wood, making it a much safer bet for a basement.
Understanding Different Core Materials
Now, not all engineered cores are made the same. The material used in that inner stack has a huge say in how the plank will perform, especially when you’re installing engineered hardwood in basement settings where moisture is always a potential issue.
When you're shopping around, you'll find the core material can have a big impact on a floor's stability and longevity.
Comparing Engineered Hardwood Core Materials
| Core Type | Composition | Moisture Resistance | Best Use Case in Basement |
|---|---|---|---|
| Plywood | Multiple thin sheets of wood (plies) glued in a cross-grain pattern. | Good to Excellent. More plies (5-9) offer greater stability against moisture. | A reliable, all-around choice for basements with moderate humidity control. |
| High-Density Fiberboard (HDF) | Wood fibers compressed with resins under high pressure into a dense sheet. | Excellent. HDF is incredibly dense, making it highly resistant to moisture penetration. | Ideal for basements where humidity might fluctuate or for high-traffic areas due to its impact resistance. |
Ultimately, both plywood and HDF cores offer fantastic stability for basement installations. Modern manufacturing techniques, particularly in binding wood fibers with advanced adhesives, have made these products more resilient than ever. Innovations in this area have not only cut down on waste but also pushed the boundaries of what's possible with engineered wood technology, making it an even smarter choice for your home.
Preparing Your Basement Subfloor for Success
A stunning floor is only as good as the foundation it’s sitting on. When you're talking about installing engineered hardwood in a basement, that’s not just a friendly suggestion—it’s the golden rule.
I always say that proper subfloor prep is 90% of the job. Skipping this step is the fastest way to see your entire investment go down the drain. Think about it: you’d never build a house on a crooked, crumbling foundation, and the same principle applies right here. Your concrete slab is that foundation.
Before a single plank even comes out of the box, that concrete has to be clean, flat, and completely dry. Any old paint, leftover adhesive, or random debris needs to go. You want a perfectly smooth surface so that any sealers can bond properly and the floor can lie perfectly flat. A professional, long-lasting result starts with this crucial groundwork.
Achieving a Flat and Level Surface
First things first, let's check for flatness. Your basement floor doesn't need to be perfectly level across the entire house, but it absolutely must be flat where the wood is going. An uneven slab creates high and low spots, which causes the planks to flex and bend when you walk on them. That flexing leads to those annoying creaks and squeaks and can eventually damage the locking system between the boards.
The best way to check is with a long, straight edge—something at least six to eight feet long works well. Lay it across different parts of the floor and look for any gaps underneath. The industry standard we work with is no dips or humps greater than 3/16 of an inch over a 10-foot span.
- Low Spots: If you find any major dips, a self-leveling compound is your best friend. You simply pour it into the low area, and it spreads out to create a perfectly flat patch.
- High Spots: For any bumps or ridges, you'll need to grind them down. You can rent a concrete grinder and carefully work the high spots until they're flush with the surrounding floor.
Confronting the Moisture Menace
Moisture is the kryptonite for any wood floor, and basements are notorious for it. Concrete is porous, almost like a giant sponge, and it can wick moisture right up from the ground. This makes moisture testing an absolutely non-negotiable step before installing engineered hardwood in a basement.
There’s a simple DIY method you can use called the plastic sheet test. Just tape a 2×2 foot square of clear plastic to the concrete, making sure to seal all four edges with heavy-duty tape. Leave it for 24-48 hours. If you come back to find condensation under the plastic or the concrete looks darker, you’ve got a moisture issue that needs to be solved.
For a more accurate reading, a professional calcium chloride or in-situ RH (Relative Humidity) test is the way to go. In fact, most flooring manufacturers require one of these tests to keep your warranty valid.
Managing moisture isn't just about the slab itself; it's also about the air. Getting a handle on controlling the humidity in your house will help create a stable environment for your beautiful new floors.
Your Final Lines of Defense
Okay, so your subfloor is flat and you've figured out the moisture situation. Now it's time to put down your final protective layers. Think of these as the last shields between the concrete slab and your engineered hardwood.
First up is the vapor barrier. This is a thick, impermeable sheet (usually 6-mil polyethylene) that acts like a raincoat for your subfloor. You'll lay it directly over the concrete to stop any moisture vapor from rising up and getting to the wood.
Next comes the underlayment. This isn't just a layer of foam for cushioning; a good underlayment does a few critical jobs:
- A Thermal Break: It stops that deep-down cold from the concrete slab from seeping up into your floor.
- Sound Dampening: It helps absorb sound, reducing echoes and the classic "click-clack" of footsteps.
- Added Moisture Protection: Many modern underlayments even come with a built-in vapor barrier for an extra layer of defense.
Taking the time to do this prep work right is the single most important thing you can do. It's what separates a floor that looks good for a year from one that looks great for a lifetime.
How to Choose the Right Engineered Hardwood
Now that your subfloor is perfectly prepped, it's time for the fun part: picking out the flooring that will completely transform your basement. It's easy to get lost in all the options, but if you zero in on a few key details, you'll land on a product that not only looks fantastic but is truly built to handle life below ground.
Think of it like choosing a good winter coat. Style matters, of course, but you also need it to stand up to harsh conditions. For engineered hardwood, the three most important things to get right are the wear layer, the finish, and how it’s installed. Nail these, and you're setting yourself up for a beautiful, long-lasting basement floor.
Prioritize the Wear Layer Thickness
The wear layer is that top slice of genuine hardwood, and its thickness is the single biggest factor in your floor's lifespan. A thicker wear layer means you can sand and refinish it more times, basically hitting the reset button after years of use. For a basement that might see everything from a home gym to a kids' playroom, a beefy wear layer is a wise investment.
- 1-2 mm Wear Layer: This is more of an entry-level option. You generally can't refinish these floors; you can only give them a light recoating.
- 3-4 mm Wear Layer: This is the sweet spot for most homes. It gives you enough wood to allow for 2-3 refinishes, which is plenty for most homeowners.
- 5+ mm Wear Layer: This is premium territory. These floors can be refinished as many times as solid hardwood, offering incredible longevity.
Choosing a plank with at least a 3mm wear layer is one of the best ways to protect your investment. It gives you the flexibility to erase future scratches and wear, keeping your floor looking pristine for decades.
Understand the Factory Finish
The finish applied at the factory is your floor's frontline defense against scratches, scuffs, and even fading from sunlight. Most quality engineered hardwood comes with several coats of an aluminum oxide urethane finish. This stuff is incredibly tough—think of it as microscopic armor protecting the wood from the daily abuse of foot traffic, pets, and scooting furniture.
When you're comparing different products, look for floors that boast at least seven to nine coats of finish. As a general rule, more coats equal more durability. A tough factory finish means less maintenance for you and a floor that stays looking new longer, which is a huge win for a multi-use space like a basement.
Select the Right Installation Method
When you're going over a concrete slab, a floating floor installation is almost always your best bet. With this method, the planks connect to each other—not to the subfloor—creating one large, solid surface that "floats" on top of the underlayment. No nails, no glue to the concrete.
This is the go-to method for basements because it allows the entire floor system to expand and contract as one unit when humidity levels change with the seasons. This simple bit of physics prevents the planks from buckling or putting stress on the joints. While you can glue engineered wood down, floating floors are just simpler and more forgiving in a below-grade environment.
This market is booming, as the global engineered wood sector was valued at $254.2 billion in 2023 and is projected to grow significantly. You can discover more insights about this trend and its impact on construction materials on alliedmarketresearch.com. While engineered wood is an excellent choice, it's not the only one; check out our guide on the best waterproof flooring for basements to explore other durable options.
Essential Installation Steps for Below-Grade Floors
So, the flooring has arrived. Your first instinct is probably to tear open the boxes and get started, but this is where a little patience goes a long way. Before you even dream of laying that first plank, there are a couple of make-or-break steps for a basement installation. Get these right, and you'll have a floor that lasts a lifetime. Rush it, and you could be looking at a total failure within a year.
First thing's first: acclimation. Wood is a natural, living material. It literally breathes, expanding and contracting with the temperature and humidity around it. Your basement has its own unique microclimate, and the new flooring needs to get used to its new home before it's installed.
Bring the unopened boxes of flooring into the basement and just let them be for at least 72 hours. This simple step allows the wood to stabilize and match the room's conditions, which is your best defense against the planks swelling, shrinking, or gapping after they're all in place.
Mastering the Floating Floor Installation
When you're working with a concrete subfloor—which is almost always the case in a basement—a floating installation is your best bet. Instead of gluing or nailing anything down, the planks simply click and lock into each other. They create one large, continuous surface that "floats" over the underlayment. This method has a massive advantage in a basement.
A floating floor can expand and contract as a single unit with seasonal changes. This is absolutely critical for long-term stability and leads us right into the next non-negotiable step.
The Importance of the Expansion Gap
As you start laying the floor, you need to leave a small gap—usually about 1/2 inch—between the flooring and any wall or fixed object. That means every wall, support post, pipe, or staircase.
Think of this as an insurance policy against buckling. This small, hidden space gives the floor room to breathe. When humidity rises and the wood naturally expands, it has a safe place to go instead of pushing against the walls and creating ugly, hazardous waves in your floor.
This expansion gap is what makes the whole floating floor system work. It’s not an optional step. Once the installation is complete, this gap is completely covered by baseboards and trim, so you'll never even know it's there. You're left with a clean, professional look and the peace of mind that your floor can handle whatever the basement environment throws at it for years to come.
Keeping Your Basement Hardwood Looking Great for the Long Haul
So, your gorgeous new engineered hardwood floor is in, and your basement has been completely transformed. Fantastic! The next step is protecting that investment so it looks just as good in ten years as it does today. A few simple, consistent habits are all it takes to make sure your flooring stands the test of time.
In any space below ground, moisture is the enemy. Your floor's best friend is a good dehumidifier, humming away in the background to keep the humidity right where it needs to be—ideally between 35% and 55%. Maintaining this stable environment stops the wood from subtly swelling and shrinking, which is what puts stress on the planks over the long run.
It's also smart to stay on the lookout for any early warnings of moisture issues. Knowing the critical signs of water damage can help you nip a small problem in the bud before it becomes a major headache.
Smart Cleaning and Everyday Protection
When it comes to cleaning engineered hardwood in a basement, the golden rule is simple: less is more, especially with water. A soaking wet mop is the last thing you want to use down here. Instead, get into a routine that actively protects the wood.
- Start with a Dry Clean: Make a habit of using a vacuum with a soft brush attachment or a microfiber dust mop. This gets rid of the daily grit and dirt that can act like sandpaper under your feet.
- Stick to Approved Cleaners: When you need a deeper clean, don't spray cleaner directly on the floor. Lightly mist a manufacturer-approved, pH-neutral hardwood cleaner onto a microfiber mop pad and then wipe.
- Wipe Up Spills Instantly: Spills happen. Just be ready to blot them up immediately with a dry cloth to stop any liquid from working its way between the planks.
One of the biggest mistakes I see people make is grabbing a traditional bucket and mop. This method leaves way too much water behind, which can dull the finish and eventually damage the wood's core, completely defeating the purpose of choosing a durable floor.
Finally, think about proactive protection. Put felt pads under the legs of all your furniture—it’s the easiest way to prevent scratches. For areas that get a lot of foot traffic, like a path to the sofa or a kids' play zone, throw down a stylish area rug. These simple touches go a long way in reducing daily wear and tear, ensuring your basement remains a premium living space for decades.
Answering Your Top Questions About Basement Hardwood Floors
Even after weighing all the pros and cons, it's totally normal to have a few final questions before you pull the trigger on engineered hardwood for your basement. Let's clear up some of the most common things people wonder about.
Can Engineered Hardwood Get Wet?
This is the big one, right? Here’s the straight answer: engineered hardwood is highly moisture-resistant, but it is not waterproof.
Its layered design gives it incredible stability against the typical humidity you'd find in a properly prepped basement, which is something solid wood just can't handle. But if you have a burst pipe or a serious leak, standing water will cause damage. That’s why getting the subfloor and vapor barrier right isn't just a suggestion—it's essential.
For a closer look at how different wood floors stack up, our guide on hardwood flooring pros and cons is a great resource.
Is It a Good Investment for Resale Value?
Without a doubt. A finished basement is a huge plus for any home because it adds valuable, livable square footage. When potential buyers walk down the stairs and see a beautiful, warm wood floor instead of cold concrete or cheap carpet, it completely changes their perception of the space.
Engineered hardwood transforms a basement from a storage area into a genuine lower-level living area, adding real financial value to your home.
A smart basement remodel that includes premium finishes like engineered hardwood can see a return on investment of over 70%. It’s one of the best ways to boost your home’s value.
How Long Will It Last in a Basement?
When it's installed correctly and you do a little basic maintenance, you can expect a quality engineered hardwood floor to last 20 to 30 years in a basement, and often even longer.
The secret is simple: run a dehumidifier to keep the humidity stable and choose a product with a nice, thick wear layer from the start. Do that, and you’ll have a floor that looks fantastic for decades to come.
Ready to transform your basement with the timeless beauty of hardwood? The experts at Flacks Flooring are here to help you select the perfect engineered flooring for your space. Visit us today to explore our collection and get a personalized consultation.