
A lot of homeowners start the same way. They stand in a room with worn carpet, dated laminate, scratched hardwood, or builder-grade vinyl and try to picture what the space could look like with a clean new plank floor. In Woodstock, that might be a family room that needs something tougher for kids and dogs. In Johns Creek, it might be a kitchen that needs a more current look and better moisture resistance.
Installing plank flooring can absolutely change a house. It can make a room feel larger, cleaner, quieter, and easier to live in. But the part that decides whether that floor still looks good years from now usually happens before the first plank ever goes down.
I’ve seen beautiful materials fail because the subfloor wasn’t checked, the room wasn’t measured carefully, or the planks were rushed straight from the box to the floor. I’ve also seen modest, affordable flooring options look excellent because the prep work was handled correctly. That’s the difference between a floor replacement that feels solid and one that starts clicking, separating, or peaking too soon.
Your Guide to a Flawless New Floor
A new floor usually starts with frustration.
The carpet won’t come clean anymore. The old hardwood has too many repairs to refinish again. The laminate edges near the sink are swollen. You’re tired of looking at it, and you want something that fits the way you live now. For many homeowners in Cumming, Alpharetta, Roswell, and across North Metro Atlanta, that means looking at hardwood flooring installation, luxury vinyl plank flooring, or laminate flooring that can handle traffic, pets, and daily mess without making the house feel like a jobsite forever.
That part is easy to understand. The harder part is knowing what really matters once you move past color and style.
A lot of generic advice online focuses on the visible steps. Snap lines. Cut the first row. Tap the seams. Install trim. Those steps matter, but they’re not where most failures begin. Trouble usually starts lower down, at the slab, the wood subfloor, the humidity level in the room, the perimeter clearance, or the decision to use the wrong installation method for the material.
A plank floor doesn’t fail because the color was wrong. It fails because movement, moisture, and subfloor conditions were ignored.
That’s especially true in North Georgia. Homes in Forsyth County, North Fulton, Cherokee County, and Cobb County deal with seasonal humidity swings, crawl space moisture, concrete slab concerns, and older rooms that aren’t perfectly square. Those local conditions change how I look at every hardwood, LVP, waterproof flooring, and floor replacement job.
If you’re planning on installing plank flooring yourself, you need the right sequence and the right expectations. If you’re hiring a pro in Cumming, Johns Creek, Canton, Milton, Woodstock, Acworth, Marietta, or Roswell, you need to know what competent installation should look like before the crew unloads a single box.
The Foundation of a Great Floor Pre-Installation Planning
Most flooring problems are planning problems.
People like to jump ahead to the part where the new planks start covering the old floor. I get it. That’s the exciting part. But if you want a floor that stays flat, locks properly, and doesn’t develop movement where it shouldn’t, the prep phase is where the job is won or lost.

Start with the room, not the flooring sample
Before choosing between hardwood, LVP flooring, laminate flooring, or another surface, look at how the room is used.
A kitchen in Alpharetta needs a different conversation than a formal dining room in Roswell. A basement-level space in Milton raises different moisture questions than an upstairs bedroom in Canton. If you’ve got dogs, heavy traffic, or a rental property, scratch-resistant flooring, pet-friendly flooring, and waterproof flooring usually move up the list fast.
Then inspect what’s under the old floor.
You’re looking for soft spots, squeaks, loose panels, cracked tile underlayment, old adhesive residue, slab moisture concerns, and any height problems at doors or transitions. If the home is older and you uncover unusual insulation or suspect material during demolition, pause long enough to understand asbestos insulation risks before disturbing anything further.
Measure honestly and buy with waste in mind
Bad measurements cause delays, ugly seam planning, and unnecessary material shortages.
Measure every section of the room, including closets, alcoves, and nooks. Don’t trust a rough guess. Rooms that look rectangular often aren’t. Bay windows, angled walls, islands, and stair landings all change the cut list.
I also tell homeowners to think beyond square footage. Ask these questions:
- What direction will the planks run: Long runs usually look cleaner, but they also affect waste and transitions.
- Where will the first full row start: A bad starting layout can leave a tiny rip on the last row.
- How many doorways and jamb cuts are involved: That adds labor fast.
- Will existing baseboards stay or be replaced: That changes how expansion gaps are concealed.
Acclimation is not optional in Georgia
This is one of the most skipped steps in DIY work, and it causes expensive callbacks.
Proper acclimation for vinyl and hardwood planks means letting them sit in the room for 24 to 48 hours before installation. Skipping that step can lead to up to 30% increased expansion, which can cause buckling and gaps, especially in areas with humidity swings like Cumming and Forsyth County, according to Measure Up Renovations on plank acclimation and expansion control.
That’s why boxes shouldn’t be dropped in the garage overnight and carried in the next morning. The material needs time in the actual interior conditions where it will live.
Practical rule: If the flooring and the room haven’t adjusted to each other, the floor is moving before you even start.
Moisture and flatness deserve more attention than style
On wood subfloors, I want to know whether the panels are dry, secure, and level enough for the product being installed. On concrete, I want moisture testing before I trust anything the slab “looks like.” A slab can appear perfectly dry and still create trouble later.
If you’re dealing with a slab-on-grade room, basement area, or any spot with past moisture history, it helps to review how to test concrete for moisture before making decisions about underlayment, adhesives, or vapor control.
Here’s the short version of what works and what doesn’t:
- What works: Clean subfloors, repaired low spots, removed fasteners, moisture testing, and a layout plan before opening all the boxes.
- What doesn’t: Installing over debris, assuming the slab is fine, mixing damaged planks into the field, and treating acclimation like a suggestion.
- What homeowners often miss: Door clearance, appliance height, toilet flange height, and transition height into tile or carpet.
A professional-looking plank floor starts below eye level. That’s true whether you’re installing affordable flooring in a rental, replacing carpet with laminate in Marietta, or planning a full hardwood flooring installation in Johns Creek.
A Guide to Plank Flooring Installation Methods
Once the prep is done correctly, the installation method has to match the material, the subfloor, and the room. That’s where a lot of people get tripped up. They choose a product first and assume every plank installs the same way.
It doesn’t.
Some floors are designed to float. Some are meant to be glued down. Traditional hardwood often needs a nail-down or staple-down approach over a wood subfloor. Each method has strengths, weaknesses, and common failure points.
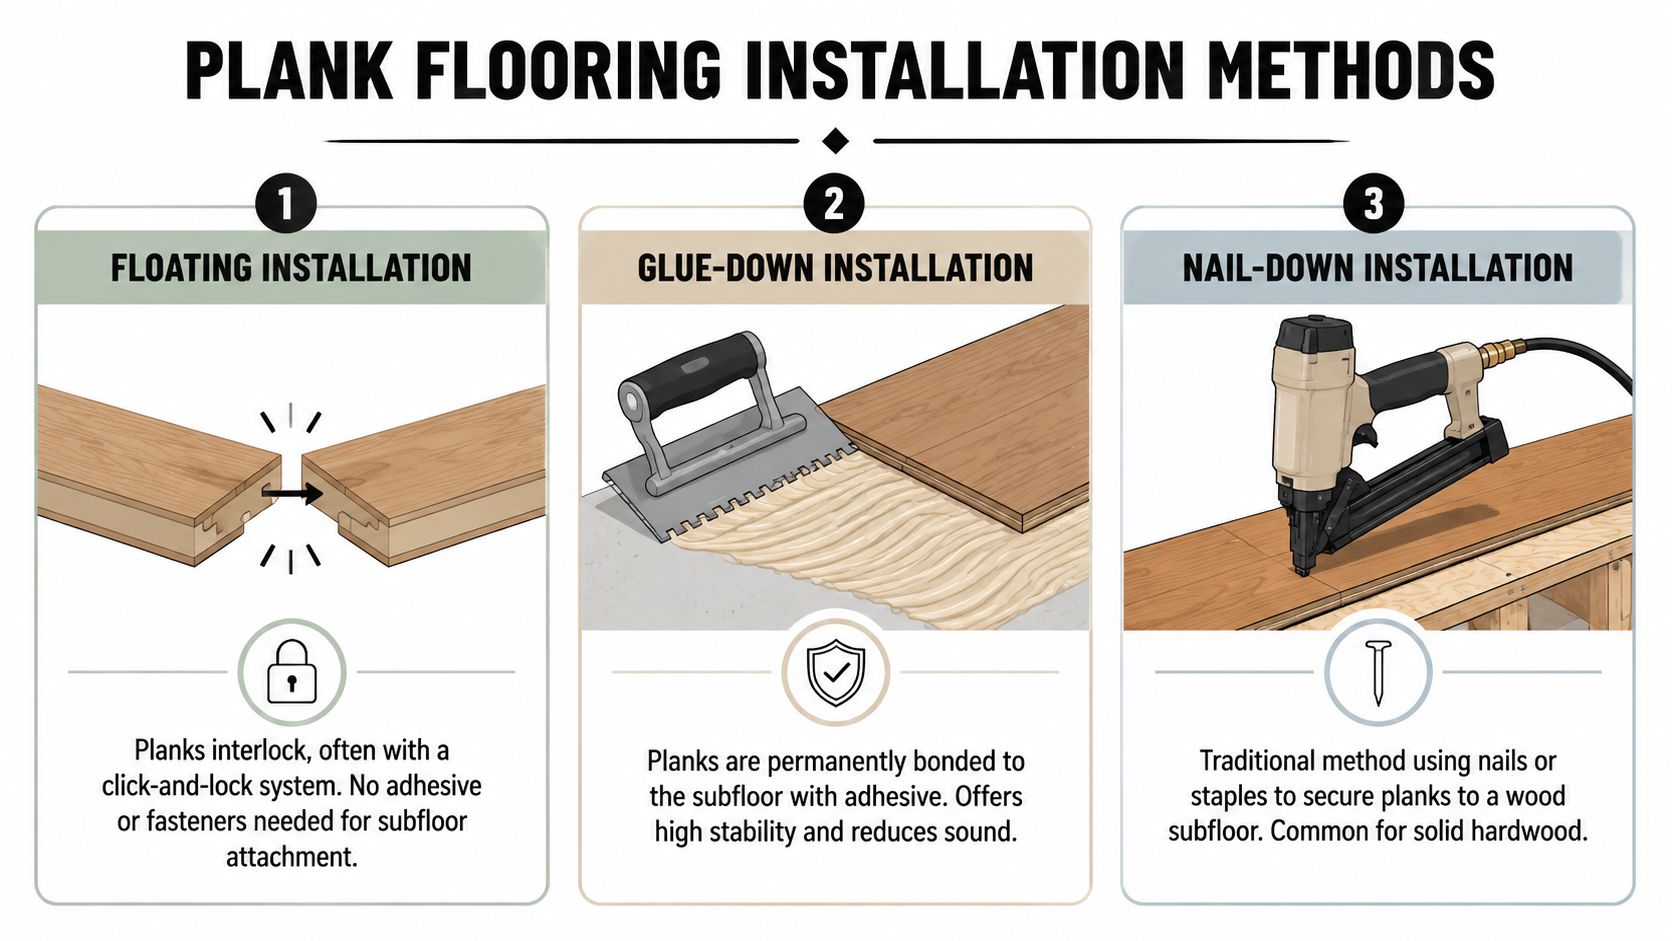
The method has to fit the floor and the house
A floating click-lock LVP floor in a Cumming ranch home is a different job from a glue-down commercial-grade plank in a busy office or a staple-down engineered wood install over plywood in Roswell.
The fundamental requirements remain constant. Your first row has to be straight. Your perimeter expansion space has to stay open. Your joints can’t form weak, repetitive patterns.
The seam pattern matters more than many people realize. End joints should be staggered by at least 6 inches, and that detail affects both strength and appearance. According to the installation guidance summarized in this seam staggering and subfloor prep reference, that requirement can be the difference between a floor lasting 15 to 20 years and one failing in 5 to 7 years.
Plank Flooring Installation Methods Compared
| Method | Best For | DIY Difficulty | Key Considerations |
|---|---|---|---|
| Floating | LVP flooring, laminate flooring, many residential floor replacement projects | Moderate | Depends on a flat subfloor, careful locking, and correct expansion space |
| Glue-down | High-traffic rooms, some waterproof flooring applications, commercial settings | High | Adhesive timing, subfloor smoothness, and clean layout are critical |
| Nail-down | Solid hardwood and some engineered wood over wood subfloors | High | Requires the right tools, fastening technique, and a suitable wood substrate |
Floating floors and click-lock planks
This is the installation type most DIY homeowners ask about.
Floating floors work well for many luxury vinyl plank flooring and laminate flooring products because the planks connect to each other rather than being fastened directly to the subfloor. When the locking system is engaged properly, the floor forms a continuous surface that can move as a unit.
What works:
- A dead-straight first row: If row one wanders, every row after it gets worse.
- Clean locking edges: Dust, chips, or broken tongues keep seams from closing tight.
- Controlled tapping: A tapping block and pull bar help. Heavy-handed pounding damages edges.
What doesn’t work is forcing boards together when the angle is wrong. If a plank won’t lock, stop and inspect it. Usually the issue is debris in the groove, a slightly out-of-square cut, or a subfloor irregularity telegraphing into the row.
For rooms where sound control or comfort matters, the underlayment choice can change how the floor feels and performs. If you’re comparing attached pad products with separate underlayment, this overview of underlayment for vinyl plank flooring is a useful reference point.
Don’t mistake “easy to install” for “hard to mess up.” Floating floors are forgiving until the prep or the first few rows are wrong.
Glue-down plank installation
Glue-down can be an excellent choice in the right setting.
It creates a more fixed feel underfoot, often reduces movement, and can perform well in demanding traffic conditions. But glue-down is less forgiving than click-lock. Once adhesive is spread, your pace matters. Your trowel work matters. Your layout matters. Your subfloor smoothness matters even more.
If there’s old adhesive residue, patching ridges, slab contamination, or rolling humps in the floor, glue-down will expose every one of them. You can’t hide bad prep under a quality adhesive.
A few trade-offs to think through:
- More stable feel underfoot
- Less room for beginner mistakes
- Harder plank replacement later
- Higher consequences for rushed prep
I usually steer DIY homeowners away from glue-down unless the room is simple and they already have experience with flooring adhesives.
Nail-down and staple-down hardwood
At this stage, hardwood flooring installation stops feeling like a casual weekend project.
Nail-down and staple-down methods are common for solid hardwood and some engineered wood products over wood subfloors. The floor has to be laid out cleanly, the fastener schedule has to be consistent, and the flooring nailer has to be set correctly so you don’t split tongues or leave boards underfastened.
Common problems include:
- Crooked starter rows that telegraph through the room
- Improper fastener placement that leads to movement or squeaks
- Poor jamb and casing cuts that make a good floor look amateur
- Overlooking board selection so color variation bunches up in one area
The best-looking hardwood installs don’t come from speed. They come from pacing, board selection, and refusing to build over a problem just to keep moving.
Installing Waterproof Flooring in Kitchens and Basements
A lot of homeowners hear “waterproof” and assume the installation is low risk. That’s not how it works in real houses.
Waterproof plank products can be a smart fit for kitchens, laundry rooms, mudrooms, and some basement spaces in Johns Creek, Milton, and Forsyth County. But the plank itself being water-resistant or waterproof doesn’t protect you from moisture coming up through the subfloor or getting trapped at the perimeter.

Kitchens need edge discipline
In a kitchen, the floor has to deal with appliance movement, sink splashes, pet water bowls, and occasional leaks that no one notices right away.
That means the details around cabinets, dishwashers, islands, and toe kicks matter. I want clean cuts, proper clearance where the product calls for movement, and a plan for the visible edges. The floor should look tight without being trapped.
A common mistake is assuming every exposed edge should be sealed the same way. Some perimeters benefit from flexible sealant in splash-prone areas. Others need trim coverage that still allows movement. If you lock down the wrong edge too tightly, the floor loses the ability to respond to seasonal changes.
Basements and slabs need moisture skepticism
Concrete causes more false confidence than almost anything else in flooring.
If the slab looks dry, homeowners often assume it is dry. That assumption costs people money. In Georgia’s humid climate, subfloor moisture management is a major issue, and improper prep can cause 60% to 70% of premature plank flooring failures, according to this flooring moisture guidance for humid climates.
That’s why basement and slab installations need a different mindset. Before laying waterproof flooring, ask:
- Has the concrete been moisture tested: Looking dry is not testing.
- Is a vapor barrier required for this product and subfloor: Product instructions matter.
- Does the room have past water intrusion or humidity issues: Flooring won’t solve those.
- Will underlayment help, or will it create problems if used incorrectly: Not every pad belongs over every slab.
If you’re comparing product types and room suitability, this guide to waterproof flooring for Atlanta-area homes helps sort out where these materials fit and where homeowners need extra caution.
Waterproof flooring protects the surface from many everyday spills. It doesn’t excuse poor slab prep underneath.
Around tubs, toilets, and laundry hookups
Bathrooms and laundry areas create a different set of edge conditions.
The cuts around toilet flanges, supply lines, vanities, and tub aprons need to be clean enough to finish properly without pinching the floor. Jagged cuts and oversized openings usually get hidden with too much caulk, and that’s where a DIY install starts looking rough.
What works well is careful dry-fitting, controlled cutouts, and finishing details that respect both appearance and movement. What fails is treating every wet-area install as if the planks alone will solve the moisture risk.
For homeowners choosing between tile flooring, waterproof flooring, or laminate in these rooms, the decision shouldn’t be made on product label alone. It should be based on the subfloor, the room’s moisture history, and how disciplined the installation will be.
Finishing Touches and Fixing Common Installation Problems
The last part of the job is where a decent install either becomes polished or gives itself away.
A floor can be laid correctly across the field and still look unfinished if the last row is rough, the trim is installed wrong, or the transitions look like an afterthought. These details don’t just affect appearance. They also protect the floor’s ability to move the way it was designed to move.

The last row and the wall line
The last row is often the row that humbles people.
Rarely is it a simple rip and drop. Walls drift. Drywall bows. Baseboards hide old irregularities. If you measured only from one point, the final course can end up too tight in one spot and too loose in another.
What usually works best is scribing that row as needed, making a clean rip cut, and checking that the floor still has room to move at the perimeter. Patience is especially important here. Rushed cuts at the end of the job are easy to spot later.
Trim and transitions need to hide the gap, not trap the floor
Baseboard, shoe molding, quarter-round, reducers, and T-moldings aren’t decorative afterthoughts. They’re functional finish pieces.
The key rule is simple. Trim should cover the expansion gap without fastening the floor itself in place. If you nail trim through a floating floor, you’re creating a restraint point where the system is supposed to move.
Good transition work does a few things at once:
- It protects the edge of the flooring at doorways and material changes
- It handles height differences between plank, tile, or carpet
- It keeps the install looking intentional instead of patched together
This is also the point where homeowners often realize that floor replacement is more than just laying planks. Adjacent surfaces have to meet cleanly.
Troubleshooting the problems I see most often
Some issues show up immediately. Others appear after the furniture is back in place.
Here’s how I think about the common ones:
Buckling or peaking
Usually points to restricted movement. The floor may be tight to the wall, tight at a doorway, or pinned by trim, cabinets, or another fixed point.Gaps between boards
Often trace back to a separated seam, debris in the joint, or uneven support underneath the plank.A plank that won’t click
Stop forcing it. Check the tongue, groove, angle, and row alignment. Damage usually happens when someone tries to muscle a bad fit into place.Hollow or drummy spots
Frequently caused by low areas in the subfloor or debris left underneath.
Small installation errors don’t stay small. They usually show up first at the edges, the seams, or the first place the floor gets daily traffic.
If you hit one of these issues during installing plank flooring, the right move is usually to back up a few rows and fix the cause. The wrong move is to keep building over it and hope trim will hide the problem. Trim hides edges. It doesn’t fix mechanics.
DIY or Hire a Pro in North Metro Atlanta
This is the question most homeowners really want answered. Can you do it yourself, or should you hire it out?
The honest answer is that both routes can make sense. Some DIY installs turn out very well. Some professional installs are worth every dollar because they avoid expensive mistakes and save a huge amount of time. The key is knowing what kind of project you have, not the one you wish you had.
The flooring installation market is large and still growing. The global flooring installation services market was valued at about USD 35 billion in 2023 and is projected to reach about USD 55 billion by 2032, according to DataIntelo’s flooring installation services market report. That same source notes that for a 1,000 square foot project, total material and professional labor can range from $1,000 to $12,000, depending on product quality and specifications. That range is wide for a reason. Complexity drives cost.
DIY makes sense when the room is simple
If you’ve got a straightforward room with a stable subfloor, square walls, and a click-lock product designed for residential use, DIY can be a reasonable option.
That’s especially true if you’re patient, comfortable with saws and layout work, and willing to spend more time on prep than you first expected. A spare bedroom or a simple bonus room is not the same challenge as a full main-level floor replacement with multiple doorways, built-ins, and transitions into tile, carpet installation, or stairs.
DIY tends to work best when:
- The layout is simple and you can maintain straight rows easily
- The subfloor is already in good condition with minimal correction needed
- The product is forgiving and the manufacturer supports that install method
- You have time to stop, correct mistakes, and work carefully
A useful way to think about this is the same way contractors think about other substrate-driven projects. The logic in this DIY vs. professional shed foundation comparison applies surprisingly well to flooring too. When the base has to be right for everything above it to work, inexperience costs more than people expect.
Hire a pro when the hidden work is the real job
A lot of jobs look simple from the top and are difficult underneath.
Older homes in Marietta or Roswell often have uneven floors, patched areas, or transitions that need to be rebuilt cleanly. Homes in Cumming, Milton, and Forsyth County may have slab moisture concerns, crawl space influence, or rooms that need careful humidity planning. If you’re installing hardwood, glue-down LVP, or a large open-concept floor, the prep and sequencing become much less forgiving.
That’s when a professional earns their keep.
A qualified installer brings moisture-testing habits, better saw setup, jamb-cutting tools, fastening equipment, patching knowledge, and a system for solving surprises without making the room look pieced together. They also know when a floor isn’t ready for installation yet, which is something DIY homeowners often discover too late.
The real cost includes tools, time, and risk
Homeowners usually compare labor quotes against material cost and stop there. That’s not the full comparison.
The complete DIY number includes blades, spacers, tapping blocks, pull bars, undercut tools, saw access, disposal, transition materials, trim work, and your time. It also includes the cost of ordering replacement cartons if the layout goes sideways or a locking edge gets damaged repeatedly.
Then there’s the question that matters most. If the floor fails, who fixes it?
That’s where professional installation often makes better financial sense, especially on high-visibility spaces, resale projects, and larger jobs where mistakes multiply. For homeowners who want in-home measuring, product guidance, and installation planning in one place, Flacks Flooring offers showroom support and consultation in Cumming and the surrounding North Metro Atlanta market.
A simple way to decide
Ask yourself these questions and answer them truthfully:
- Is the room easy, or does it have multiple problem areas
- Am I installing a beginner-friendly product, or one that punishes small mistakes
- Do I know how to evaluate the subfloor before buying materials
- Will I still be comfortable doing this after demo, dust, and unexpected repairs
- If the floor starts separating or peaking later, do I know why
If your answers are confident and the room is simple, DIY may be a smart path.
If you’re unsure about the substrate, moisture, layout, transitions, or warranty requirements, hiring a pro usually saves money the longer you look at the full picture. That’s especially true when you’re choosing between hardwood flooring installation, luxury vinyl plank flooring, laminate flooring, or waterproof flooring for a busy household in North Fulton, Cherokee County, Cobb County, or Forsyth County.
If you’re planning a floor replacement in Cumming, Johns Creek, Milton, or the surrounding North Metro Atlanta area, Flacks Flooring is a practical place to start. You can compare hardwood, LVP, laminate, carpet, and waterproof flooring options, get guidance on what fits your home and subfloor, and schedule an in-home consultation when you want a clearer path from selection to installation.