
Transition molding is that crucial finishing touch that bridges the gap between different flooring surfaces, giving your home a polished, complete look. Think of it as the punctuation at the end of a sentence—it’s a small detail, but without it, the whole thing feels unfinished and just a little bit off.
It’s the piece that ensures a smooth walk from your hardwood living room into your tiled kitchen or carpeted bedroom, eliminating those awkward, unfinished edges.
The Unsung Hero of Your Hardwood Floors
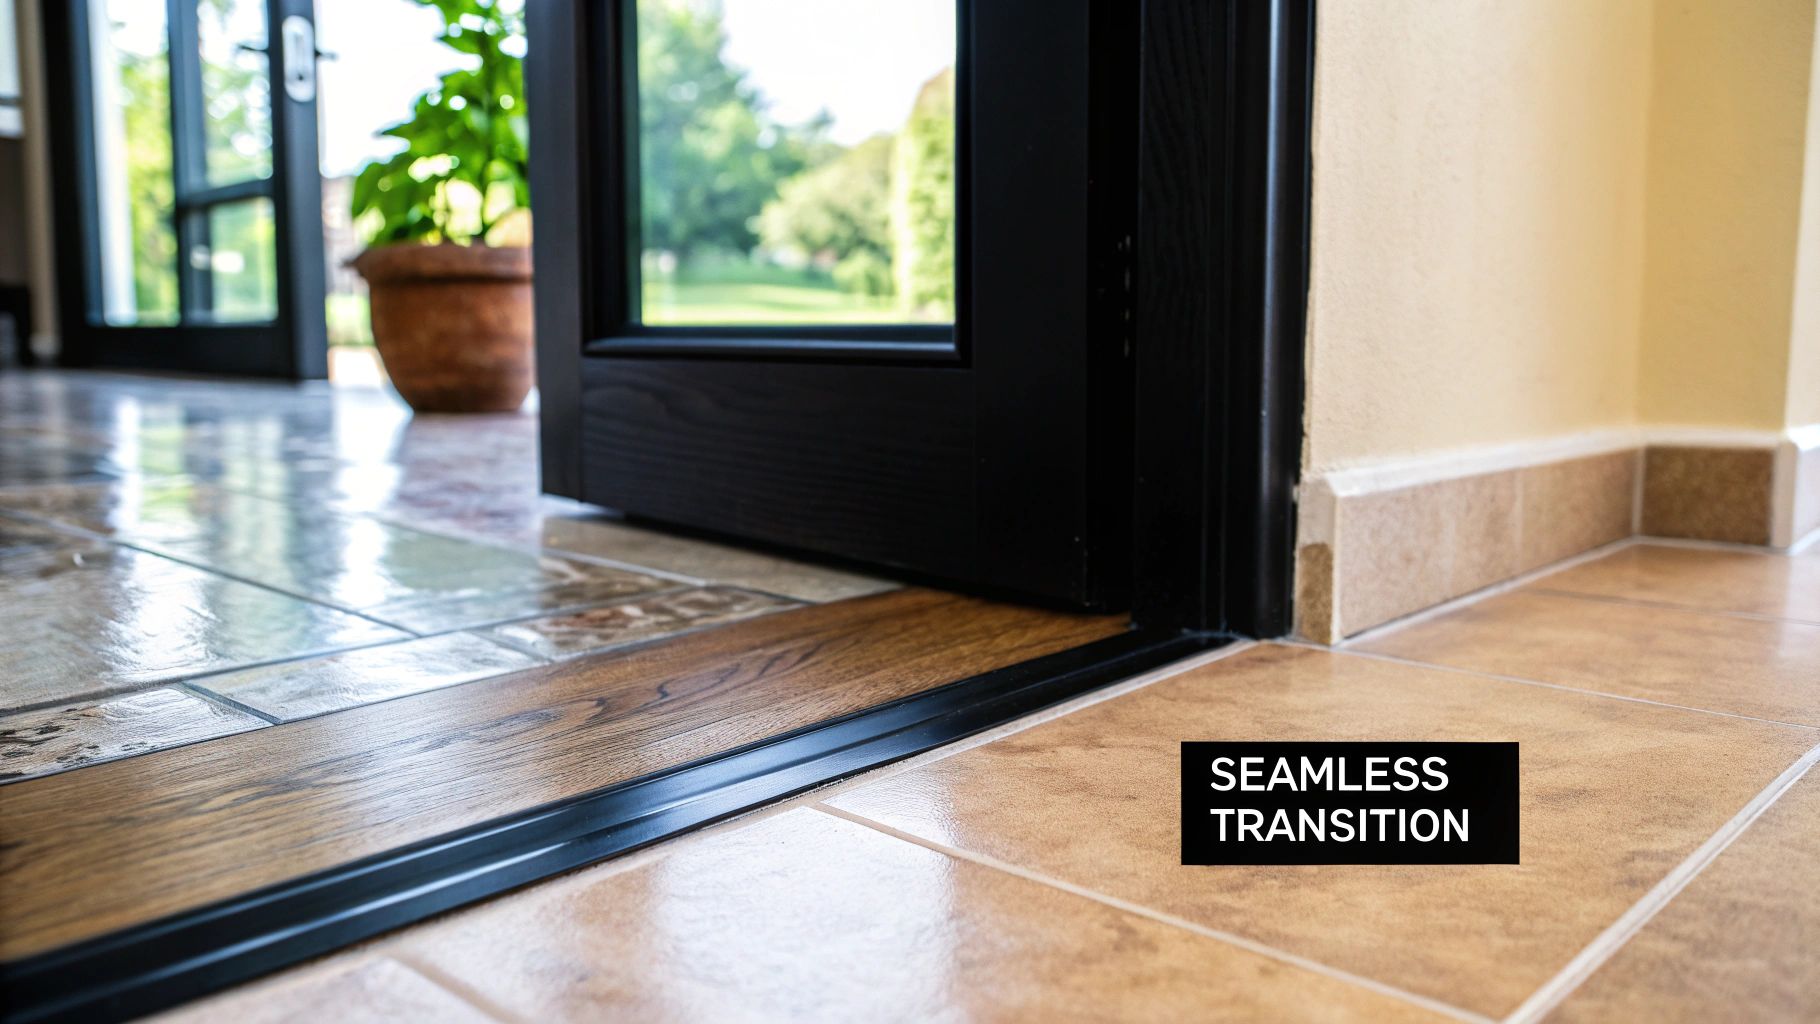
We all get excited about picking the perfect wood species and finish, but it’s the transition molding that truly elevates a flooring project from good to great. It's much more than just a piece of trim; it’s a workhorse that solves real-world problems while adding a touch of elegance.
This little strip of wood plays a few really important roles. Its most obvious job is to create a safe, smooth path between different types of flooring. But what it does behind the scenes is just as critical.
The Real Job of Transition Molding
Hardwood is a natural, living material. It breathes, expanding and contracting with the seasonal shifts in humidity and temperature we experience here in North Georgia. To allow for this movement, installers must leave a small space around the perimeter of the floor, known as an expansion gap.
Transition molding for hardwood floors is specifically designed to cover these gaps. Without it, your beautiful new floors could buckle, warp, or cup as the seasons change. It's an essential part of a long-lasting, professional installation.
This is especially true as the hardwood flooring market continues to grow, with projections hitting USD 55.46 billion globally by 2026. For homeowners in communities like Cumming, Johns Creek, and Milton, blending new hardwood with existing floors is a common renovation project. This is where quality transition strips become invaluable, preventing trip hazards and unsightly gaps that can drag down your home’s value.
Key Takeaway: Don't mistake transition molding as a mere decorative accent. It’s a functional necessity that protects your investment by accommodating the natural movement of hardwood, preventing damage, and ensuring safety where different floors meet.
The table below breaks down the key jobs that transition molding handles.
Why Transition Molding Is Non-Negotiable
| Function | What It Prevents | Best For |
|---|---|---|
| Covers Expansion Gaps | Buckling, warping, and cupping of hardwood planks. | All hardwood installations, especially in humid climates. |
| Bridges Different Heights | Tripping hazards and awkward, uneven surfaces. | Connecting hardwood to thicker materials like plush carpet or tile. |
| Creates a Clean Seam | Unsightly gaps and exposed, raw flooring edges. | Joining hardwood with any other flooring type (tile, vinyl, carpet). |
| Adds Aesthetic Finish | An incomplete, "unfinished" look. | Providing a polished, intentional design element to any room. |
Ultimately, understanding what these little pieces do helps you see why they’re so important. They truly are the final touch that signals a job done right.
If you want to dive deeper, you can check out our comprehensive guide on flooring transitions for more detailed information.
Getting to Know the Different Types of Transition Molding
Figuring out transition molding for hardwood floors can feel a little overwhelming at first, but it's simpler than it looks. Each piece is designed for a very specific job. Think of them like different types of bridges—each one built to connect two points in a particular way.
Once you understand what each profile does, you'll start noticing them everywhere. You'll see why a certain piece was used in a doorway versus another one next to a fireplace. It's all about creating smooth, safe, and professional-looking connections from one room to the next.
The Four Main Players in Your Project
Let's walk through the four essential types of transition molding you'll need to know. Luckily, their names give you a big clue about what they do.
T-Molding: Just like its name suggests, this piece is shaped like a capital "T." Its one job is to connect two hard floors that are at the exact same height. It fits neatly into the expansion gap between the two floors, creating a clean, seamless look. This is the piece you'll almost always use in doorways where hardwood meets tile, or when you need a transition between hardwood planks running in different directions.
Reducer Molding: A reducer is your go-to when you have a slight height difference between two floors. It creates a gentle slope from your higher hardwood floor down to a lower floor, like sheet vinyl, low-pile carpet, or even a concrete slab in a garage entryway. It "reduces" the height for a smooth walkover, preventing a trip hazard.
End Cap (or Square Nose): An end cap is like a picture frame for your floor—it gives it a clean, finished edge. You use this piece where your hardwood floor comes to a dead stop against something else, like a fireplace hearth, a sliding glass door track, or a raised threshold. It neatly caps off the raw edge of the wood for a polished look.
Stair Nose: This one is all about safety and durability on your steps. A stair nose finishes the front edge of each stair tread, overlapping the hardwood plank. It provides a tough, rounded edge that can handle constant foot traffic while protecting the more vulnerable edge of the flooring plank. This is an absolute must-have for any staircase project.
Expert Insight: You'll also hear about quarter-round and shoe molding. While they're often used in flooring projects, they aren't true transition pieces. Their job is to cover the expansion gap between the floor and the wall baseboards, not to connect two different types of flooring.
Choosing the right profile is absolutely key for making your floors look professionally installed and last for years. If you want to dive deeper into how all these pieces fit into the broader world of trim, check out our guide on the different types of floor molding. Getting the terminology right from the start makes planning your project so much easier.
Choosing the Right Profile for Every Room
Knowing the different types of molding is the first step, but the real skill lies in picking the perfect one for each spot in your home. This is where a flooring project goes from just "done" to truly professional. It's all about creating connections between rooms that are seamless, safe, and look like they were always meant to be there.
Think of it like being a good cook—you have to know which ingredient to use and when. You wouldn't use a T-molding where a reducer is needed any more than you'd use salt instead of sugar. The wrong choice can create an ugly trip hazard and make the whole job look amateur. Let’s walk through a few real-world scenarios you’d find in any home around here in Cumming or Johns Creek.
Practical Scenarios and Solutions
Every doorway tells a story of two different floors meeting. Your job is to make sure it's a happy ending.
Hardwood Hallway Meets a Carpeted Bedroom: This is the classic example of an uneven transition. A reducer molding is your best friend here. It creates a gentle slope from the higher hardwood down to the carpet, which prevents stubbed toes and protects the edges of both floors from fraying and damage.
Kitchen Hardwood Flows into a Tiled Mudroom: If both floors were installed correctly, they should be at the same height. This is the perfect job for a T-molding. It neatly bridges the small gap left for expansion, creating a clean, continuous line while allowing both floors to breathe.
Finishing Hardwood Against a Sliding Glass Door: Your new floor can't just stop abruptly. An end cap (sometimes called a threshold) provides a clean, squared-off finish. It protects the exposed edge of the wood from wear and tear and looks much more polished against the door track.
This simple flowchart is a great way to visualize the decision-making process, which almost always starts with one question: are the floors the same height?
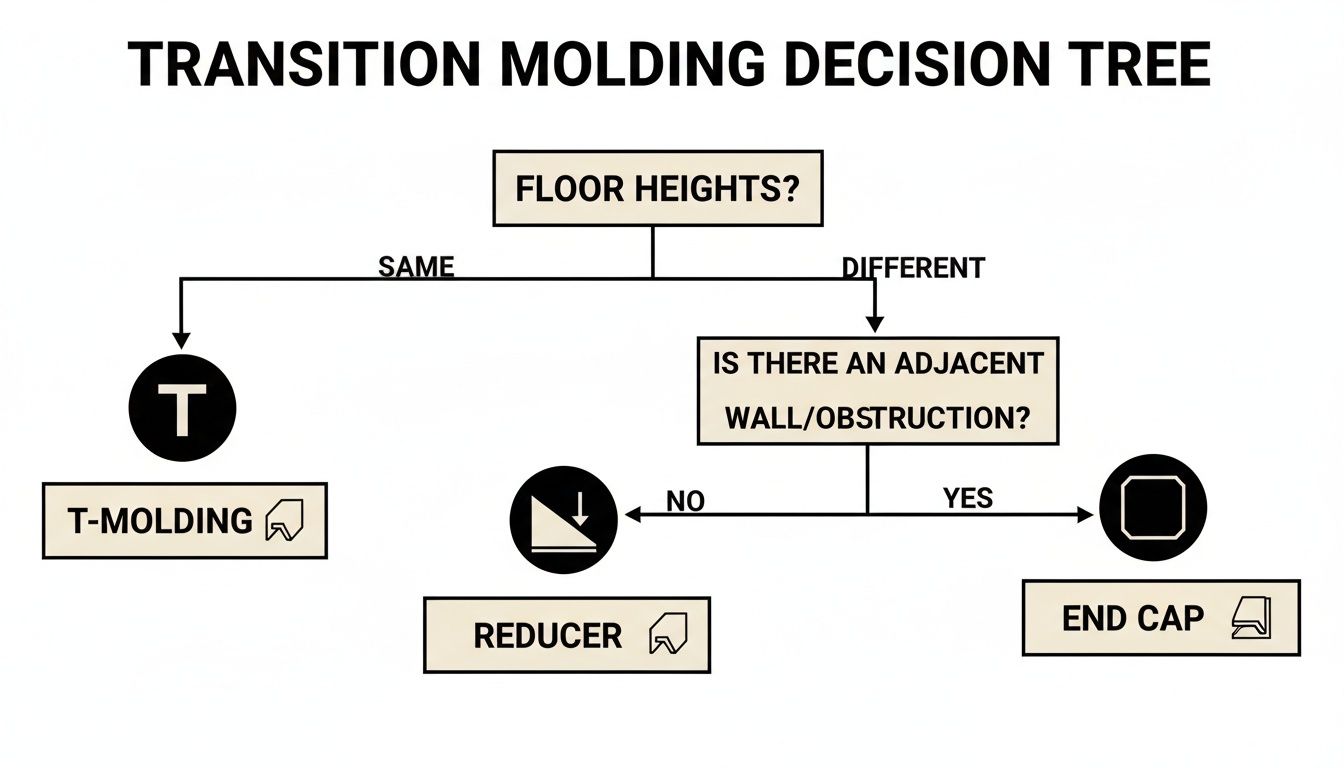
As the chart illustrates, figuring out the height difference between the two surfaces you're connecting is always the first move.
To make it even simpler, here’s a quick-reference guide to help you make the right call.
Transition Molding Match-Up Guide
| Situation | Recommended Molding | Key Consideration |
|---|---|---|
| Connecting two floors of the exact same height. | T-Molding | Ensures there's room for natural expansion and contraction. |
| Stepping down to a lower floor (e.g., carpet or vinyl). | Reducer | Creates a safe, gradual slope to prevent tripping. |
| Finishing the floor against a wall or vertical object. | Quarter Round or Shoe Molding | Hides the expansion gap between the flooring and the baseboard. |
| Ending the floor at a doorway or sliding door. | End Cap or Threshold | Provides a clean, protected, and finished edge. |
| Transitioning up to a much thicker surface (like high-pile carpet). | Carpet Reducer or Z-Bar | Specifically designed to tuck and hold the edge of the carpet. |
Choosing the right profile is a huge part of getting a professional result that you'll be happy with for years to come.
Beyond the Shape: Material Matters, Too
Once you’ve nailed down the right shape, you have to pick the material. This choice affects everything from the final look and durability to your budget.
An Expert's Take: The best material is always the one that fits the location. A transition in a high-traffic entryway or a moisture-prone bathroom has very different demands than one leading into a quiet bedroom. Always consider foot traffic, the chance of water exposure, and your overall design goals.
Here’s a quick rundown of the most common options:
Matched Hardwood: This is the top-tier choice for creating a seamless, high-end look that flows perfectly with your floors. While it offers a flawless aesthetic match and can be stained to perfection, it can be more expensive and may show scratches in heavy-use areas.
Durable Metal (Aluminum or Brass): Ideal for high-traffic zones, commercial spaces, or where wood meets very low-profile flooring like commercial carpet. Metal is extremely durable and offers a sleek, modern look, but it won't match the wood grain and can feel cold underfoot.
Versatile Vinyl: A great pick for budget-friendly projects or in moisture-prone areas like basements and bathrooms. Vinyl is waterproof, affordable, and comes in a huge variety of wood-look finishes, though it may not feel as premium as real wood and won't last as long.
Getting these choices right is more important than you might think. In fact, the market for floor transition strips is projected to reach USD 2,766.1 million by 2035, driven by a growing understanding of their importance. Improper transitions are to blame for a staggering 15-20% of all post-installation flooring complaints. Using the correct transition molding for hardwood floors dramatically cuts down on these issues, saving homeowners a ton of money and headaches down the road. You can explore more data on this growing market and see just how critical these small pieces are to a successful installation.
Matching Your Molding Color and Finish
The best transition molding is the one you don't even see. It’s meant to blend in so perfectly that your eyes glide from one room to the next without a second thought. Achieving that seamless, intentional look is part art, part science, and it all starts with one key decision.
You'll need to choose between pre-finished and unfinished molding. Pre-finished pieces are a fantastic, time-saving option if you can find one designed to be a perfect match for your flooring right out of the box.
If your floors have a unique hue or have developed a rich patina over the years, unfinished molding is your best bet. Think of it as a blank canvas, ready for you to stain to the perfect shade.
Nailing the Perfect Match
When you're working with unfinished molding, a few insider tricks can make all the difference. Whatever you do, don't try to match a stain color from memory or a photo on your phone. Wood has subtle undertones that screens just can't replicate accurately.
Pro Tip: Always bring a physical sample of your hardwood flooring with you when you go shopping for stain. The key is to test potential stains on a small, leftover piece of the molding itself, not on your flooring plank. Different woods—and even different cuts from the same tree—can take stain in surprisingly different ways.
This testing step is absolutely critical for a flawless result. It’s the only way to guarantee the color will look right when it's all said and done.
To get that truly seamless look, you also need to understand the different wood coatings available. The right topcoat not only protects the molding but also lets you match the sheen of your existing floors, whether it's matte, satin, or gloss.
The Deliberate Contrast
While a perfect match is the standard, sometimes a bold, high-contrast transition can make a powerful design statement. Imagine using a dark, almost-black molding to create a clean border between a light oak floor and dark slate tile. It’s a modern, intentional look.
This technique works best when it feels purposeful and ties in with other elements in the space, like black window frames or dark cabinet hardware. It's a great way to turn a functional piece into a striking feature that helps define and frame the room.
Installation Insights: Should You DIY or Hire a Pro?
You've found the perfect piece of molding, and now it's time to put it all together. Installing transition molding for hardwood floors can look deceptively simple on the surface—just measure, cut, and secure it, right? But as any seasoned installer will tell you, this final touch is where precision makes all the difference, elevating a functional piece into a seamless, professional feature.
The basic steps are straightforward. You measure the gap, use a miter saw to get a clean, exact cut, and then secure the piece. Many of today's transition strips use a clever track system. You fasten a metal track to the subfloor, and the molding just snaps right into place. This is a great innovation because it hides any nail holes and gives the flooring underneath room to breathe—expanding and contracting with the seasons as wood naturally does.
Common DIY Pitfalls to Avoid
It’s tempting to turn this into a weekend project, but a few common slip-ups can quickly turn a simple job into a nagging headache. Even a tiny mistake can stick out like a sore thumb against your beautiful new floors.
Imprecise Cuts: Being off by even 1/16th of an inch can leave a gap that’s impossible to ignore. On the flip side, cutting it a hair too long will cause the molding to bow or sit awkwardly, creating a trip hazard and a visual flaw.
Forgetting the Expansion Gap: Remember, the molding's job is to cover the expansion gap, not fill it. If you nail or glue the transition strip directly to the hardwood planks, you're pinning them down. This restricts their natural movement and can lead to squeaks or even buckling later on.
Using the Wrong Adhesive: If your molding requires adhesive, grabbing any old construction glue is a mistake. You need a flexible adhesive that moves with the floor. The wrong type will create the same problems as nailing it down improperly.
When to Call in a Professional
So, what's the final verdict—DIY or call a pro? Honestly, it depends on your comfort level, the tools you have on hand, and how complex the job is. If you're looking at tricky angles, have a lot of transitions to do, or you've invested in high-end hardwood, bringing in a professional is a smart move.
Key Consideration: A professional installation isn't just about a perfect fit; it's often about protecting your flooring warranty. Many manufacturers will void their warranty if the flooring (and its components) are installed incorrectly. A small DIY mistake could become a very expensive one.
Hiring an expert guarantees every cut is precise and every piece is secured correctly for the long haul. This is especially critical for homeowners in Johns Creek or Milton who might be prepping a house for sale. A clean, seamless finish makes a huge impression on potential buyers. In fact, studies suggest flawlessly integrated floors can boost buyer interest by as much as 20% in mid-to-high-end homes.
Ultimately, a pro brings peace of mind and a result that looks fantastic and holds up over time. You can learn more about what to expect when you hire experts for your flooring project and see if it’s the best choice for you.
Your Top Questions About Transition Molding Answered
Let's finish up by tackling some of the most common questions we hear from homeowners around Cumming and Forsyth County about transition molding for hardwood floors. Think of this as your final checklist—the essential details that ensure your new floors don't just look amazing, but also function perfectly for years to come.
Getting these little things right is what separates a good flooring job from a great one.
Can I Just Use One Type of Molding for Everything?
It's a question we get all the time, but unfortunately, the answer is a firm no. Trying to use a single molding profile everywhere is a bit like using a butter knife to chop vegetables—it just wasn't designed for the job and the results won't be pretty. Each type of transition molding is engineered for a very specific purpose.
A T-molding, for instance, is perfect for connecting two floors that are the exact same height. Its shape brilliantly bridges the gap while giving both surfaces room to expand and contract. But if you tried to force it between a tall tile floor and a shorter wood plank, you'd end up with an ugly, wobbly lip that's a major trip hazard. That’s a job for a reducer, which is built to create a smooth, gentle ramp between those different heights.
The Bottom Line: Choosing the right profile is about more than looks. It's absolutely critical for the safety and long-term health of your floors. Using the wrong piece can lead to damaged planks, broken molding, and a serious risk of trips and falls.
How Big Should the Expansion Gap Be?
Ah, the expansion gap—that small, hidden space we leave around the edge of a hardwood installation. It might not look like much, but it's probably the single most important factor in making sure your floor lasts a lifetime. It gives the wood crucial breathing room as it naturally expands and contracts with the seasons.
The general rule of thumb is to leave a gap between 1/4 inch and 1/2 inch. But this isn't a hard and fast rule. The perfect gap size really depends on a few things:
- The Wood Itself: Some species, like hickory, move a lot more than others, like a stable white oak.
- Plank Size: Wider planks will expand more across their grain than narrower ones, so they need a bit more space.
- Our Local Weather: Here in Georgia, those humid summers make a proper expansion gap completely non-negotiable.
Your flooring manufacturer will have specific guidelines for their product, so always start there. When you're not sure, having a seasoned installer from the Johns Creek or Milton area take a look is the smartest move. They'll know exactly how to account for your home's unique environment.
What’s the Best Way to Clean and Maintain Transition Strips?
Good news on this front: keeping your transition molding in top shape is incredibly easy. For the most part, you can just clean them right along with the rest of your hardwood floors. A quick sweep with a soft-bristle broom, a pass with a dust mop, or a vacuum (using the hard floor setting!) is all you need to handle daily dust and dirt.
When it's time for a deeper clean, stick with a pH-neutral cleaner made specifically for wood floors. Definitely stay away from pouring on water, using steam mops, or grabbing an all-purpose chemical cleaner. Those can strip the finish and damage the wood underneath.
It’s also a good idea to give them a quick look-over every few months. Just check to make sure they're still firmly in place and not wiggling underfoot. If you catch a loose piece early, it's a simple fix that prevents a bigger problem down the road. This little bit of care will keep your transitions looking seamless for as long as you have your floors.
Ready to make sure every last detail of your flooring project is handled with expertise? The team at Flacks Flooring has spent over 30 years helping homeowners in Cumming, GA, and beyond get flawless, beautiful results. Visit our showroom or schedule an in-home consultation today!